Home > Studio Recording DIY Projects> Sony MXP-3000 Mic Preamp My next task is racking up the (2) transformer type preamps into a 1u rack case. It will be powered by the split power supply shown here. Stay tuned! Continuation.... Here's a picture of the 1u rack chassis I'm going to use... 11" deep, 1/8" anodized aluminum front panel, with oven-baked painted body.
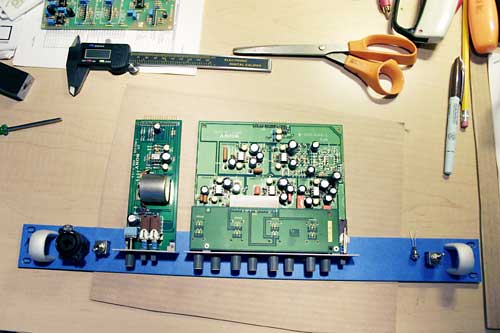
First, I layout everything that will go inside the chassis so I can plan for clearances and routing of wires. I also lay down the switches, jacks, transformers and power supply to see how it will all look.
(2) XLR/TRS combo jacks will be located in front (2 channels). Switches besides the XLR jacks will be for the "phase reverse" switch. Also, the power switch will be at the right corner, along with an LED lamp to indicate Power On. At the back panel, I'm using another XLR/TRS combo jack for inputs, and an XLR male and 1/4" TRS jacks for outputs for each channel. The power transformer is an 18-0-18V low-profile toroid transformer for minimum hum. On the upper right, you'll see my split power supply PCB with 48V phantom power capability. The (2) brown looking transformers will be the output transformer for a balanced output. These trannys came from a vintage MCI 416 studio console. I found (2) parametric equalizers that came from the same console, so I decided to rack 1 preamp and 1 EQ per chassis. First, we layout all the parts.
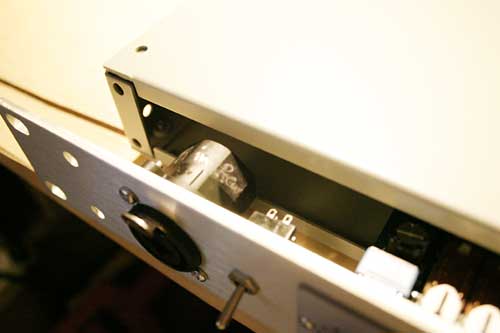
Put the XLR-TRS jack, phase switch jack, preamp, EQ module, power on lamp, and power on switch on the 1u faceplate. The blue covering you see on the faceplate is painter's tape so I won't scratch the aluminum finish when I'm working on it... it's also easier to write notes and drill locations on tape than on aluminum metal. The top and bottom lid of the 1u case has a lip... so it's causing some problems for me.
I'll need to file them and do a cutout so the modules and XLR jack will clear it.
This is a preview of things to come. Looking good.
From left to right... XLR/TRS combo jack, phase reverse switch, Gain knob, pad switch, phantom power switch, EQ knobx (4 sets of freq, level, and peak button), EQ in/out button, led power on, power switch. Update: I finished filing the lip that prevents the top cover from sitting properly... the EQ module was getting in the way... So I wired everything one night. The EQ didn't come with any documentation so I had to do some reverse-engineering and PCB tracing, to figure out which pin is what. So I need to figure out which is the ground pin, the power supply pins (+/-), signal input and signal output pins. The ground pin was the easiest to figure out. For the split power supply pins, the two capacitors near the pins offered a clue... they must be power supply filter caps, and they are! I verified the proper polarity by getting the datasheet for the NE5534 and figuring out which pin is (V+) and which one is (V-). Using the datasheet, I also figured out which pin is the INPUT and OUTPUT. Then it's just a matter of tracing and following the copper trace until I arrive at the destination.
|


