NEW!!! SC-1
Mic Preamp Kit
Status: Under Development:
May 2, 2007
I received PCB Rev3 from the manufacturer,
built prototype #003, hooked-up the wires,
Power on, and there ya go!.... it works
again!
I may be biased, but this kit is SO EASY
to assemble!!! I'm not kidding. The only
time consuming part is putting in all
the resistors (lots of it... 25pcs),
but as soon as you're over that hump,
it's just easy going after that.
The other thing that needs some care,
is soldering the Red Grayhill switch.
The pins are pretty close together. Need
a sharp tip soldering iron, and a magnifying
glass (if you're like me with an old
man eyesight)!
I am real pleased with Rev3 PCB. All the
pots and switches fit perfectly.
Now, this may just be quibbling, but the
the Phantom Power ON position (if the
PCB is installed vertically) is pointed
downwards. If the PCB is installed horizontally,
then the phantom power on position is
pointed to the right (which seems to
be right). So Rev3 is recommended for
horizontal mounting.
I'm now wondering if I should correct
this on Rev4. i.e. phantom power On position
will be UP or LEFT (depending if vertical
or horizontal mounting).
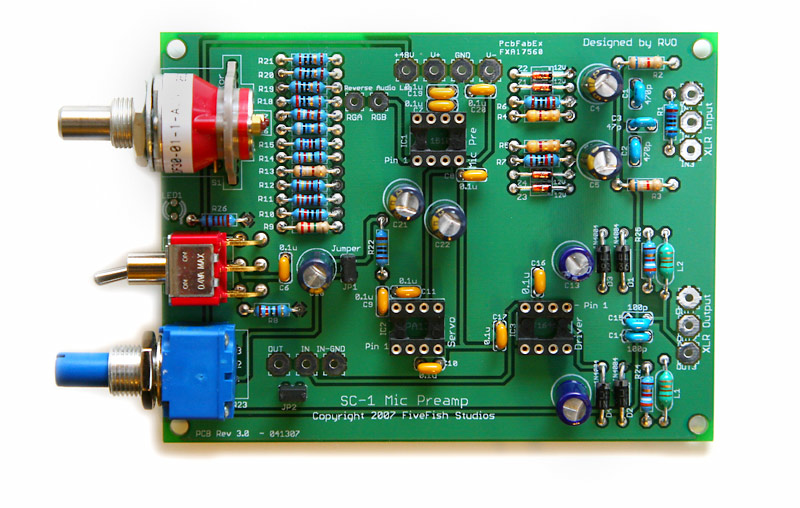
Photo of the finished Rev3 KIT. (IC chips
not inserted yet, and LED not soldered
yet)

The
additional bypass capacitors used
in Rev3 PCB design is well worth it.
I also added jumper headers (kinda like
the jumper in motherboards) so you don't
have to solder "jumper" wires
in.
JP1 is a jumper if you don't want to use
DC Servo and instead want capacitor coupling.
If you want to use DC SERVO, keep the
jumper in.
JP2 is a jumper if you don't want to use
any INSERTS. If using an INSERT jack,
remove jumper JP2.
The blue potentiometer is conductive plastic
in a sealed box. Unlike carbon potentiometers,
these won't fade easily and become scratchy.
The Grayhill (red selector switch) has
a nice, heavy, solid feel to it. Unlike
the plastic rotary switches. Well worth
the money spent here.
TIP: I found out that the quality of your
regulated PSU is highly critical to the
performance of the SC-1 preamp. I tried
my bench PSU (which was a commercial
kit) and found it to be extremely noisy
when used with the SC-1.
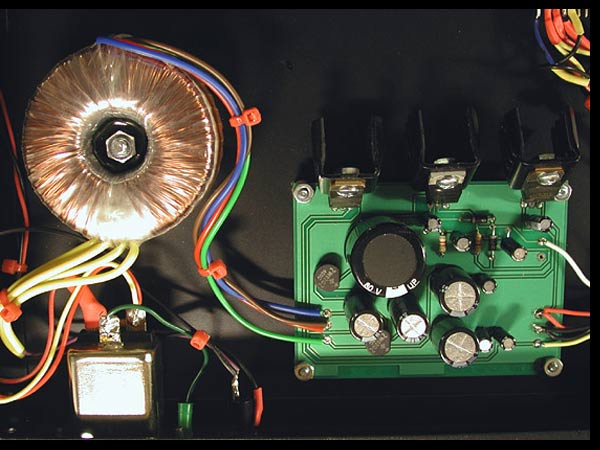
On the other hand, my custom designed
18-0-18 PSU is very quiet when used with
the SC-1. So don't skimp on the PSU when
building your preamp... otherwise, you
may be greeted with a noisy preamp.

May 3, 2007
I made Rev4, and sent it out today for
prototype manufacturing. Wait another
5 days, and then we'll see how it
performs:
Rev4 adds
a) Soft-start phantom power... think of
it as a gentle start up of 48V, instead
of slamming 48V directly to your expensive
mic.
b) INSERT JACK - SEND protection (If you
short the output to ground, it won't
blow up your delicate mic preamp).
c) Design change in gain selector for
less/minimized/elimination of pops and
clicks when changing gain settings.
Today, I tried playing with the Rev1 design
and comparing it with the Rev3 design.
I'm learning and discovering new things.
All I can say is the Rev3 is a well worth
change. And the upcoming Rev4 should
be even better.
1. Rev3 is RF resistant. This could be
because of the Grayhill on-board selector
switch compared to the clumpy wiring
of Rev1 (using off board selector switch).
There is also output RF protection using
JWMiller inductors. Shunt those RF to
ground. Result? Cleaner signal, very
miniscule RF noise.
RECOMMENDATION: DO NOT BE CHEAP and use
an off board selector switch. Use the
Grayhill switch I will recommend in the
parts list.
2. I noticed that using a cheap mic like
the Behringer C-2 and turning on phantom
power in Rev1 generates LOTS OF HUM...
120Hz, and multiples of it (240Hz, 360Hz
etc.) Using a better mic like an MXL
991 does not generate hum in Rev1 design.
However, Rev3 design is hum free even
with phantom power ON on both the cheap
Behringer C-2 and the better MXL991 mic.
RECOMMENDATION: BEHRINGER IS REALLY CRAPPOLA.
But Rev3 design still allows you to use
this cheap mic and get the most use out
of it, and make it sound clean (no hum).
Of course, using any better mic with
the Rev3 design is just over-the-top
sweet.
3. Great care has been taken to make this
preamp RF/hum and noise free. But all
this can go to waste if you use a crappy
power supply. Not all regulated power
supply are created equal. I've tried
the SC-1 on (2) different regulated power
supplies. It was noisy using my bench
regulated PSU, and clean and noise-free
using my custom designed PSU.
RECOMMENDATION: Don't skimp on the PSU
that will power your SC-1, don't skimp
on cheap power transformers, or cheaply
built power supply (breadboards, point-to-point
wiring, etc). Use my PSU-1848 for your
SC-1. :)
That's all for now....
|